
Products >> Online Help >> RTSP Client User Manual
RTSP Client User Manual
Content
1. Introduction
2. Launching the application
3. Main window overview
4. Video display layouts
5. Playing a stream
6. Video window controls
7. Context menu
8. Full-screen mode
9. Video wall (multi-monitor)
10. Snapshots
11. Video recording
12. Media information
13. System settings
14. Custom layout
15. Saving and loading layouts
16. Audio control
17. Audio backchannel
18. Online help
19. Troubleshooting
1. Introduction
Happytime RTSP Client is a multi-channel RTSP streaming player for desktop platforms. It lets you connect to one or more RTSP cameras / servers, view live video and audio in a grid of video windows, take snapshots, record video, and control audio playback.
Key features :
Play multiple RTSP streams simultaneously (1, 4, 6, 9, or 16 channels)
Multiple RTP transport modes: UDP, multicast, TCP interleaved, HTTP tunnel, WebSocket tunnel
Hardware-accelerated video decoding
Audio playback with per-window volume / mute control
Snapshot capture (JPEG)
Video recording to AVI files
Flexible video-window layout, including a custom grid
Save and load window layouts (including stream URLs and credentials)
Automatic reconnection after signal loss
Multi-language support (English / Chinese)
2. Launching the application
Start the application by running the RtspClient executable. The main window appears with the title "Happytime rtsp client 7.1".
On the first run, the default 4-window layout is shown.
3. Main window overview
The main window consists of two areas:
Video display area — a grid of video windows used to display live streams.
Toolbar — a horizontal bar at the bottom with the following buttons:
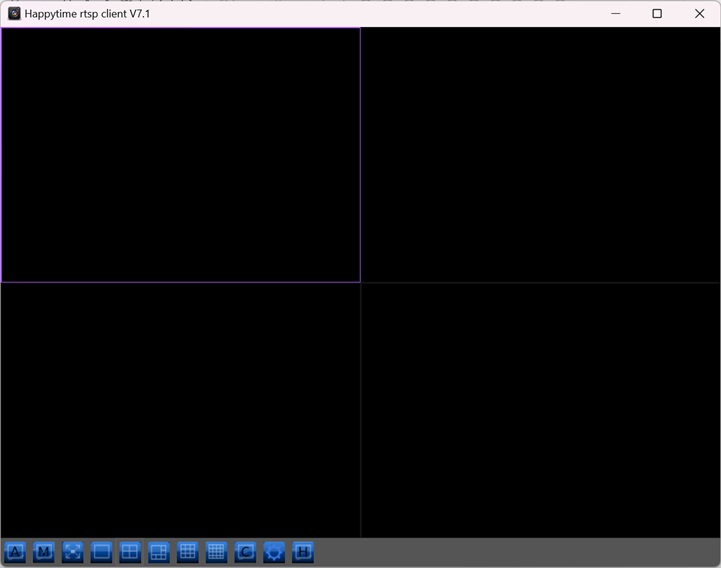
Toolbar buttons :
 : Stop all video streams.
 : Mute the audio of all streams.
 : Switch the whole window to full-screen.
 : Switch to a 1-window layout.
 : Switch to a 4-window layout.
 : Switch to a 6-window layout.
 : Switch to a 9-window layout.
 : Switch to a 16-window layout.
 : Open the custom layout editor.
 : Open the video wall configuration and enter multi-monitor wall mode.
 : Open the system settings dialog.
 : Open the online help page.
4. Video display layouts
Use the layout buttons on the toolbar to change how video windows are arranged.
1 / 4 / 6 / 9 / 16 — predefined grid layouts.
Custom layout — define your own grid with an arbitrary number of rows and columns, and merge/span cells into larger zones (see Custom Layout).
Switching layouts preserves currently playing streams. Windows that are no longer used are reused where possible.
5. Playing a stream
Method 1 — Play button (empty window) :
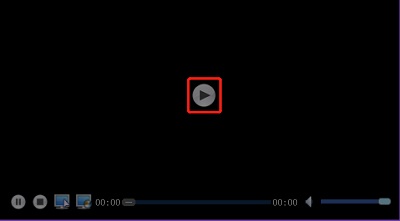
1. Hover the mouse over an empty (black) video window. A large Play button appears in the center of the window, as the following:
2. Click it to open the Set rtsp stream dialog, as the following:
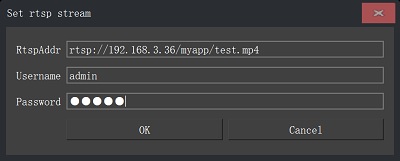
3. Enter the following information, then click OK to start playing:
RtspAddr — the RTSP URL, e.g. rtsp://192.168.1.100:554/stream1
Username — optional user name for authentication
Password — optional password for authentication
Method 2 — Drag and drop :
Drag an RTSP URL (for example, from a web browser or a text file) and drop it onto an empty video window. The stream starts automatically.
Supported URL schemes :
rtsp:// — standard RTSP over TCP or UDP
rtsps:// — RTSP over SSL (TLS)
http:// / https:// — RTSP tunneled over HTTP
ws:// / wss:// — RTSP tunneled over WebSocket
Note : Credentials can also be embedded directly in the URL, e.g. rtsp://user:password@host:port/path.
Connection status : The video window displays the connection status as overlay text:
Connecting — the client is establishing the connection
Connect failed — the connection could not be established
Authenticate failed — the user name / password was rejected
NO Signal / NO Data — no media data is being received
When a stream is lost (connection failure, no signal, or no data), the client automatically tries to reconnect after 5 seconds.
6. Video window controls (floating control bar)
Move the mouse over a playing video window to reveal a floating control bar, as the following:
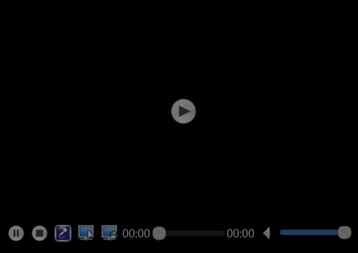
Controls :
Pause / Play — pause or resume playback
Stop — close the current stream
Microphone — enable / disable the audio backchannel (talk-back)
Snapshot — capture a still image of the current video
Record — start / stop video recording
Progress — shows the current play time / total duration; drag to seek
Volume — mute / unmute, and adjust the volume
The control bar hides automatically when the mouse leaves the window.
7. Context menu (right-click)
Right-click on a video window to open the context menu with these options:
Close Video — stop the current stream
Fill the whole window / Keep the original aspect ratio — switch the render mode
Full Screen / Exit Full Screen — toggle full-screen for this window
Media information ... — show codec and resolution details (see Media Information)
8. Full-screen mode
Double-click a video window, use the context menu, or press the Full screen toolbar button to enter full-screen mode.
Press Esc to exit full-screen mode.
9. Video wall (multi-monitor)
The Video Wall feature distributes the video windows across one or more physical monitors to build a large video wall (up to 4 screens, 25 cells each = 100 streams).
Entering the video wall :
1. Click the Video Wall button on the toolbar.
2. The Video Wall Setting dialog opens with a graphical view of your monitors.
3. Configure the wall (see below) and click OK, as the following:
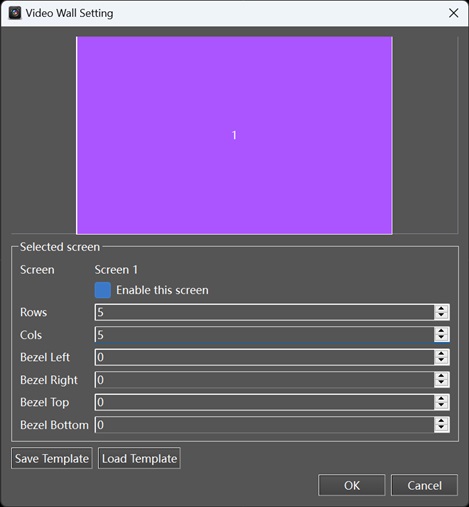
Configuring the wall :
Monitor arrangement — the top area paints your physical monitors. Click a monitor to select it.
Enable this screen — check to include the selected monitor in the wall.
Rows / Cols — set the grid size for the selected monitor (1–5 each).
Bezel Left / Right / Top / Bottom — enter the physical bezel width (in pixels) of the monitor so that images are compensated across the wall seams.
Save Template / Load Template — save the current wall configuration to an XML file, or load a previously saved one.
The wall configuration is independent of the regular window layout and is stored in a separate XML file.
Behavior :
When you enter the wall, all currently playing streams are kept alive and are migrated onto the wall surfaces without interrupting playback. Streams are placed by matching their URL; any leftover streams fill the remaining empty cells.
Each monitor shows its own grid of video windows. All per-window features (floating control bar, context menu, snapshot, recording, volume, etc.) keep working on the wall, as the following:
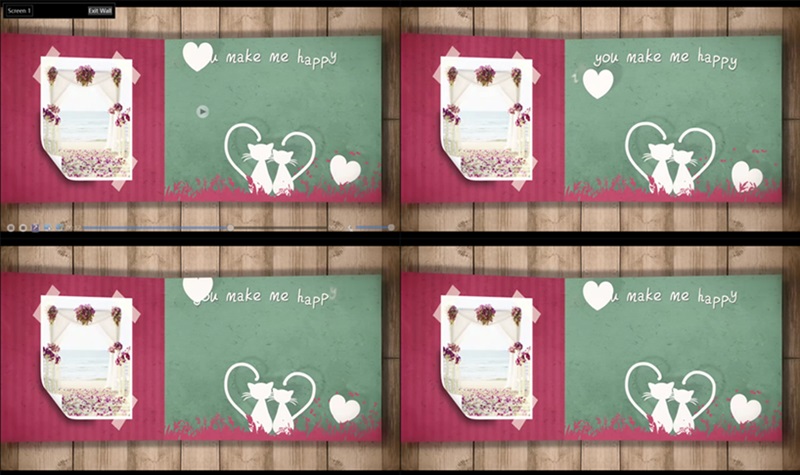
Each surface shows a small Screen N label and an Exit Wall button in the top-left corner.
Exiting the video wall :
Press Esc on any wall surface, or click the Exit Wall button, to return to the main window. All streams migrate back to the main window grid and continue playing.
10. Snapshots
1. Hover over the video window and click the Snapshot button.
2. The image is saved as a JPEG file in the snapshot path.
The snapshot save location is configured in System Settings → Recordings → Snapshot Path. A confirmation dialog shows the save path after a successful snapshot.
11. Video recording
1. Hover over the video window and click the Record button to start recording.
2. Click it again to stop recording.
Recorded video is saved as an AVI file in the recording path configured in System Settings → Recordings → Recording Path.
You can configure automatic file splitting in System Settings:
Max recording time — split the file after the given duration (HH:mm:ss)
Max file size (KB) — split the file after the given size
When the limit is reached, a new file is created automatically.
12. Media information
Right-click a video window and select Media information ... to open the Media Information dialog, as the following:
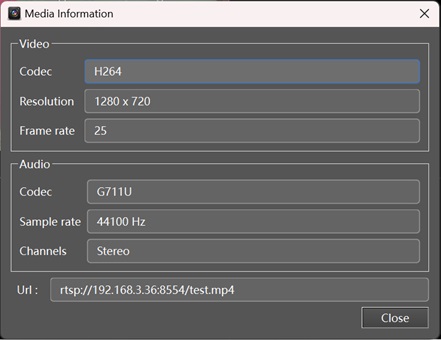
Video : codec, resolution, frame rate
Audio : codec, sample rate, channels
Url : the stream URL
13. System settings
Click the button on the toolbar to open the System Settings dialog, as the following:
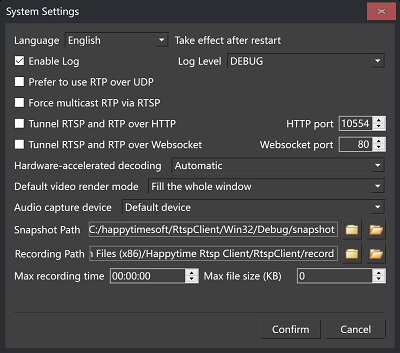
Settings are grouped into the following sections:
General
Language : Interface language: System / English / Chinese (takes effect after restart)
Enable Log : Enable / disable log output
Log Level : TRACE / DEBUG / INFO / WARNING / ERROR / FATAL
Transport
Prefer to use RTP over UDP : Use RTP/UDP for media transport instead of TCP interleaved
Force multicast RTP via RTSP : Force multicast RTP transport
Tunnel RTSP and RTP over HTTP : Tunnel RTSP/RTP over HTTP (with the specified HTTP port)
Tunnel RTSP and RTP over Websocket : Tunnel RTSP/RTP over WebSocket (with the specified port)
Request metadata channel data : Request the ONVIF metadata channel
Video & Audio
Hardware-accelerated decoding : Automatic / platform-specific / Disable
Default video render mode : Keep the original aspect ratio / Fill the whole window
Audio capture device : Select the microphone used for the audio backchannel
Recordings
Snapshot Path : Directory for snapshot images (browse / open buttons)
Recording Path : Directory for recorded video files (browse / open buttons)
Max recording time : Maximum recording time before file splitting
Max file size (KB) : Maximum recording file size before file splitting
Video Window Layout
Save Layout : Save the current layout (including stream URLs) to an XML file
Load Layout : Load a layout from an XML file
Click Confirm to save and apply the settings, or Cancel to discard them.
14. Custom layout
Click the button to open the Custom layout setting dialog, as the following:
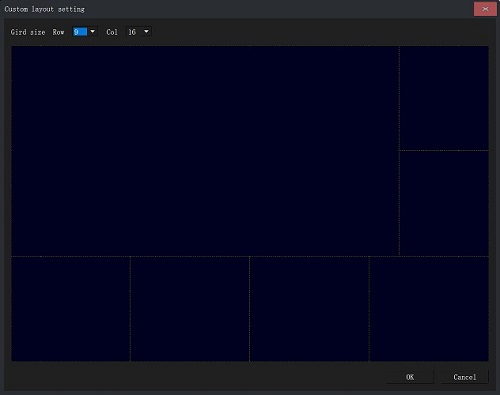
1. Choose the grid Row and Col size.
2. In the grid editor, select cells to merge them into larger zones.
3. Click OK to apply the layout.
The custom layout lets you create arrangements such as a large main window plus several smaller windows, as the following:
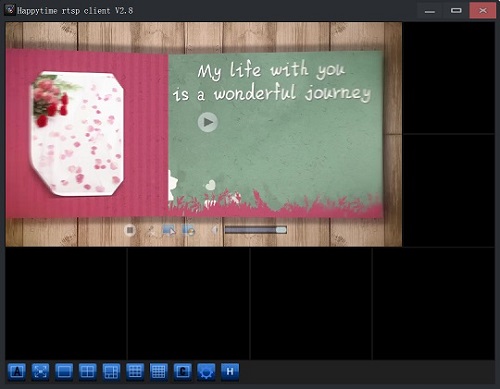
15. Saving and loading layouts
Save Layout (in System Settings) : exports the current layout, the number of rows/columns, and the stream URLs / credentials of each window to an XML file.
Load Layout (in System Settings) : imports a previously saved layout and reconnects the configured streams automatically.
The layout is also saved automatically when you close the application and restored on the next start.
16. Audio control
Volume : use the volume slider on the floating control bar to adjust the volume of a single window.
Mute : click the volume icon to mute / unmute a window.
Mute all : use the toolbar button to mute all windows at once.
17. Audio backchannel (microphone)
The Microphone button on the floating control bar enables talk-back audio (the ONVIF backchannel), as the following:
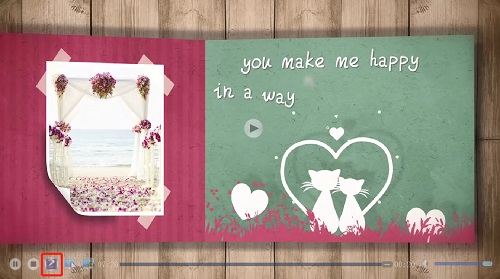
Select the input device in System Settings → Video & Audio → Audio capture device.
Note : The microphone button is only available in builds that include backchannel support.
18. Online help
Click the Online help toolbar button to open the online help page in your default web browser.
19. Troubleshooting
"Connect failed" : Check the RTSP URL and that the camera/server is reachable. If the server requires a different transport, adjust the Transport settings.
"Authenticate failed" : Verify the username and password.
"NO Signal" / "NO Data" : The stream is not sending media. Check the camera and network; the client will auto-reconnect.
No picture but audio plays : Check the video codec and try a different hardware-decoding setting (System Settings).
Video is stretched : Switch the render mode to "Keep the original aspect ratio".
Cannot save snapshot / recording : Verify the snapshot / recording path exists and is writable.
Choppy video on UDP : Try "Tunnel RTSP and RTP over HTTP" or TCP transport in System Settings.