
Products >> Online Help >> RTMP Client User Manual
RTMP Client User Manual
Content
1. Overview
The Happytime RTMP Client is a desktop application for playing live RTMP streams. It supports multi-window viewing (up to 25 windows in various layouts), audio/video playback, per-window snapshot and video recording, hardware-accelerated decoding,
customizable window layouts, saved layout presets, and a multi-monitor video wall that spreads video windows across several physical screens.
This manual describes the desktop (Windows/Linux/macOS) version of the client.
2. Supported stream URLs
The client plays live RTMP streams. The following URL schemes are accepted:
rtmp:// — standard RTMP
rtmpt:// — RTMP over HTTP (tunneling)
rtmps:// — RTMP over TLS/SSL
rtmpe:// — RTMP with encryption
rtmpfp:// — RTMP over Flash Player secure tunnel
rtmpte:// — RTMPE over HTTP tunnel
rtmpts:// — RTMPE over HTTPS tunnel
If authentication is required, a username and password can be supplied together with the URL.
3. Main window
3.1 Main video area
The central area of the main window is the video area, which displays one or more video windows side by side in a grid. Click a video window to select it (a purple border highlights the selected window). Move the mouse over a window to reveal its floating control bar.
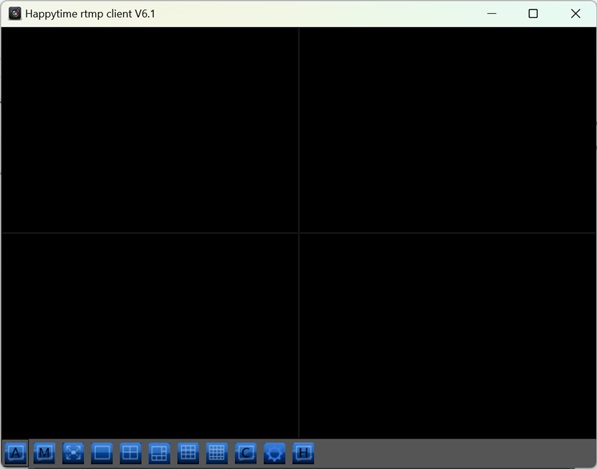
Throughout this manual, "video window" means one grid cell in the main window or on a video wall surface. "Video Wall" (Section 8) refers to spreading windows across multiple monitors.
3.2 Toolbar
A toolbar is located at the bottom of the main window:
 : Stop all videos — closes all video windows and disconnects all streams.
 : Mute all videos — mutes the audio of all video windows at once.
 : Full screen — makes the whole main window full screen (press
 Esc to exit).
 /
/  /
/  /
/  /
/  : Switches the video area to a preset layout.
 : Custom layout — opens the custom layout dialog to define a grid of video windows.
 : Video wall — opens the multi-monitor video wall (see Section 8).
 : System setting — opens the System Settings dialog.
 : Online help — opens the online documentation in a web browser.
4. Video window operations
4.1 Setting a stream
Each video window is empty until a stream is assigned. To assign a stream, use any of the following methods:
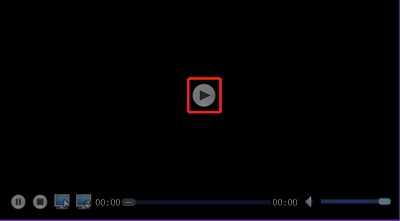
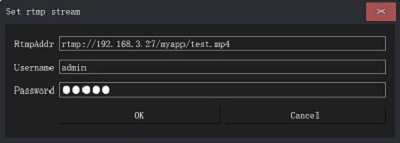
Play button : hover over the window and click the Play button in the floating control bar. The Set RTMP Stream dialog appears where you enter the stream URL (and optionally a username/password), as the following:
Double-click the window to open the Set RTMP Stream dialog.
Drag & drop a plain-text RTMP URL directly onto the window.
Set RTMP Stream dialog :
RtmpAddr — the RTMP stream URL (must start with a valid scheme, see Section 2)
Username — optional username for authentication
Password — optional password for authentication
Click OK to start playing. If the URL is empty or has an invalid format, a message is shown and you are returned to the dialog.
4.2 Playback status
While a stream is being loaded or played, status messages are displayed on the video window in red text:
Connecting — the client is connecting to the server
Connect failed — could not establish the connection
NO Signal — no video/audio signal received
NO Data — no media data received
Authenticate failed — the username/password was rejected
In most failure cases the client automatically reconnects every 5 seconds.
4.3 Floating control bar
When you hover the mouse over a playing video window, a semi-transparent control bar appears at the bottom of the window, as the following:
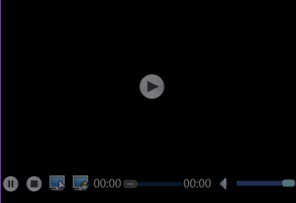
Play — opens the Set RTMP Stream dialog (to change the stream)
Pause / Play — toggles pause of the current stream
Stop — stops and clears the current video window
Snapshot — captures the current frame and saves it as a JPG file
Record — starts/stops recording the stream to an AVI file
Elapsed time — current playback position (MM:SS or HH:MM:SS)
Progress bar — drag to seek to a different position (for seekable content)
Duration — total duration of the content
Volume — click to mute/unmute the window
Volume slider — adjusts the window's volume
4.4 Right-click context menu
Close Video — stops the stream and clears the window
Fill the whole window — scales the video to fill the entire window (may distort)
Keep the original aspect ratio — scales the video while preserving its aspect ratio
Full Screen / Exit Full Screen — makes/restores this window full screen (press Esc to exit)
Media information ... — shows a dialog with codec and resolution details (see Section 9)
4.5 Full screen
Double-click a video window (or use the context menu) to make it full screen. Press Esc or double-click again to restore.
5. Snapshot
1. Hover over the playing window and click the Snapshot button in the floating control bar.
2. The current frame is saved as a JPG file in the snapshot directory (default: ./snapshot next to the application; can be changed in System Settings).
3. The file name is built from the stream host and the capture time, for example hostname_20260825_153000123.jpg.
4. A confirmation dialog shows the full save path. If saving fails (for example, the path is invalid), a warning is displayed.
6. Video recording
1. Hover over the playing window and click the Record button in the floating control bar. The button changes to the "stop recording" icon.
2. The stream is recorded to an AVI file in the recording directory (default: ./record; can be changed in System Settings).
3. The file name is built from the stream host and the start time, for example hostname_20260825_153000123.avi.
4. Click the button again to stop recording. If the stream reconnects while recording, the recording automatically resumes for the new connection.
5. The recording can be limited by maximum recording time and maximum file size (configured in System Settings).
7. Window layouts
7.1 Preset layouts
Use the toolbar buttons to switch between preset layouts: 1, 4, 6, 9, and 16 windows.
7.2 Custom layout
Click the Custom Layout button to define your own grid, as the following:
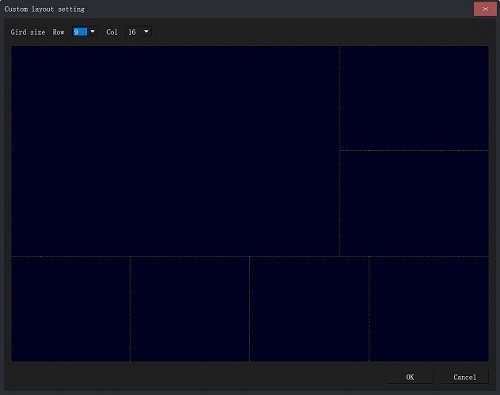
1. Choose the number of Rows and Cols for the grid.
2. In the zone editor, draw zones (video window regions) by selecting cells; each zone can hold one stream.
3. Drag & drop an RTMP URL onto a zone to assign a stream.
4. Click OK to apply the custom layout to the main video area.
7.3 Saving and loading layouts
The current layout (including window arrangement and assigned streams) is remembered automatically and restored when the client starts.
You can also save or load layouts explicitly as XML files:
1. Open System Settings.
2. Under Video Window Layout, click Save Layout to export the current layout to an XML file, or Load Layout to import a previously saved XML layout file.
8. Video wall (multiple monitors)
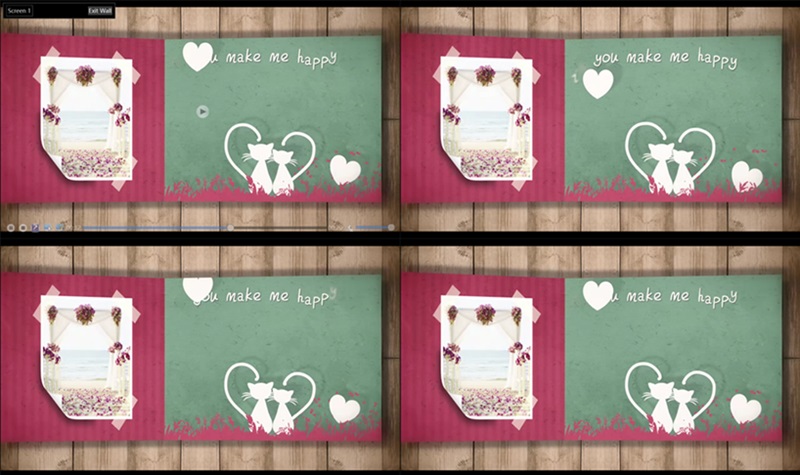
The Video Wall feature extends video viewing across several physical monitors. This is useful for control-room or multi-display setups where one or more screens act as a single video wall. Every enabled monitor shows its own borderless, full-screen grid of video
windows, as the following:
8.1 Entering the video wall
1. (Optional) Start the streams you want to show in the main window first. Live windows are carried into the wall automatically.
2. Click the Video Wall button on the toolbar.
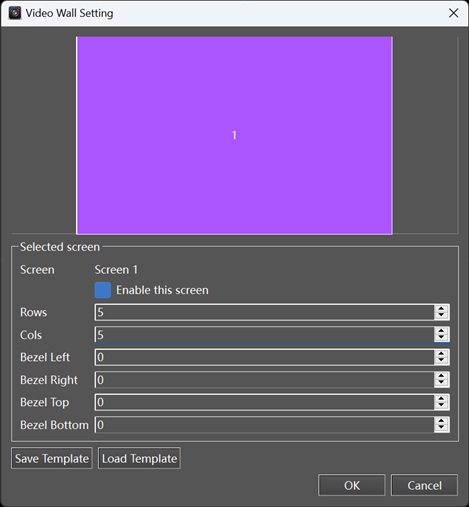
3. In the Video Wall Setting dialog, configure the screens to use (see Section 8.2), then click OK, as the following:
4. The main window hides, and each enabled monitor opens a full-screen wall surface.
Currently playing windows are moved onto the wall without being stopped. A window whose URL matches a configured zone is placed into that zone; the remaining empty zones are then filled with the other live windows. Streams that do not fit are kept aside and are restored when you
exit the wall.
While the wall is active, all per-window operations still work on every surface: play, pause, stop, snapshot, record, volume, progress, and the right-click context menu.
8.2 Configuring the video wall
The Video Wall Setting dialog appears when you enter the wall:
The upper panel draws a scaled picture of all connected monitors. Click a monitor to select it.
The Selected screen panel configures the monitor that is currently selected:
Enable this screen — include this monitor in the wall.
Rows / Cols — grid size of the video windows on this screen (each 1 to 5, up to 25 windows per screen).
Bezel Left / Right / Top / Bottom — bezel compensation in pixels (0 to 200). The video grid is inset by these amounts so pictures are not hidden behind the physical bezel frames of the monitor wall.
Save Template / Load Template — export/import the whole wall configuration as an XML file (root element VideoWall, one screen element per enabled monitor).
OK applies the configuration and enters the wall; Cancel aborts.
Up to 4 monitors are supported, with up to 25 zones on each monitor.
8.3 Video wall surface
Each full-screen surface shows:
A small overlay in the upper-left corner with the monitor label (e.g. Screen 1) and an Exit Wall button.
A grid of video windows matching the rows/columns you configured for that screen.
You can start additional streams on the wall just like in the main window (Play button, double-click, or drag & drop an RTMP URL onto a window).
8.4 Exiting the video wall
Exit the wall using any of the following:
Press Esc (from any wall window).
Click the Exit Wall button in the upper-left overlay of a surface.
Right-click a video window on the wall and choose Exit Video Wall.
When you exit, all streams are moved back into the main window layout and the main window is shown again. The toolbar Stop All and Mute All buttons also affect all wall surfaces while the wall is active.
9. Media information
Open the context menu (right-click) on a playing window and choose Media information ..., as the following:
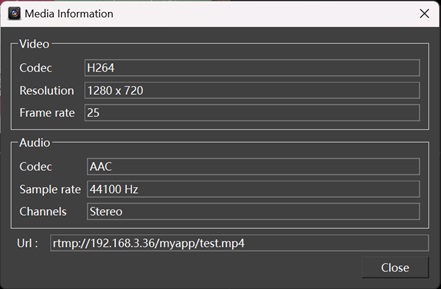
Video : Codec (e.g. H.264, H.265), Resolution (width × height), Frame rate (fps)
Audio : Codec, Sample rate (Hz), Channels
Url : the stream URL being played
10. System settings
Click the System setting button on the toolbar to open the System Settings dialog, as the following:
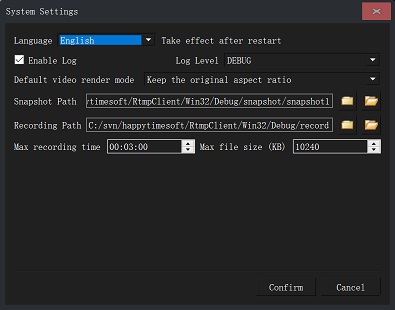
10.1 General
Language : System / English / Chinese. Takes effect after restart.
Enable Log : Enables/disables writing log files (file name prefix rtmpclient).
Log Level : TRACE / DEBUG / INFO / WARNING / ERROR / FATAL.
10.2 Video
Hardware-accelerated decoding : Automatic / Direct3D11 Video Acceleration / DirectX Video Acceleration (DXVA) 2.0 / Disable (options depend on the platform)
Default video render mode : Keep the original aspect ratio / Fill the whole window
10.3 Paths
Snapshot Path : Directory where snapshot JPG files are saved (browse / open)
Recording Path : Directory where recorded AVI files are saved (browse / open)
10.4 Recording
Max recording time : Time limit (HH:mm:ss) after which an ongoing recording stops automatically
Max file size (KB) : Size limit (KB) after which an ongoing recording stops automatically
10.5 Video Window Layout
Save Layout : Exports the current main-window layout to an XML file
Load Layout : Imports a main-window layout from an XML file
Click Confirm to apply and save the settings, or Cancel to discard changes.
Note : the snapshot path and recording path are validated when the dialog is confirmed; an existing directory must be selected.
11. Keyboard shortcuts
Esc — exit full screen (single window or whole main window).
Esc — exit the video wall.
12. Log files
If logging is enabled (see Section 10.1), the client writes log files with the name prefix rtmpclient (e.g. rtmpclient-20260825_112744.log) in the application directory. The log level controls how detailed
the output is. Logs are useful for troubleshooting connection and decoding issues.
13. Frequently asked questions
Q1. The video window keeps showing "Connect failed" / "NO Signal".
The client attempts to reconnect automatically every 5 seconds. Verify that the stream URL is correct, the server is running, and the stream is being published. Check the log file for more details.
Q2. Why does the image look stretched?
The default render mode is "Keep the original aspect ratio". If it is set to "Fill the whole window", the image is scaled to fill the window and may appear distorted. Change the mode in the right-click context menu or in System Settings.
Q3. Where are my snapshots and recordings saved?
By default in ./snapshot and ./record (relative to the application). You can change both locations in System Settings (see Section 10.3).
Q4. Video is not using hardware decoding.
Check the "Hardware-accelerated decoding" option in System Settings (see Section 10.2). On Windows, the available modes are D3D11 and DXVA2; choose "Automatic" to let the client select the best available mode, or "Disable" to force software decoding.
Q5. How do I play multiple streams at once?
Switch to a multi-window layout (4 / 6 / 9 / 16 or a custom layout), then assign a stream to each window using the Play button or drag & drop.
Q6. How do I use several monitors as a video wall?
Click the Video Wall toolbar button, enable the screens you want in the Video Wall Setting dialog (set rows/columns and, if needed, bezel compensation), and confirm. Existing streams move onto the wall automatically. Press Esc, click Exit Wall, or use the
context menu Exit Video Wall to return to the main window.